I love handprint art, so naturally, I fell hard for these 6 Handprint Christmas Crafts!
This list has ideas for early learners, elementary-aged students, and the whole family!
Handprint art is so special to me as a mother because it preserves a moment in time, of when they were this small, the handprint serves as a lovely reminder as they grow!
Incorporating them into holiday decor means that each year we will be able to see the changes in the children from the time they made the decoration!
Below are links to 6 awesome hand print Christmas crafts your kids will love to make!
Christmas Tree Handprint Art
Christmas Tree Handprint Art
Rudolph Christmas Card
Handprint Rudolph the Red-Nosed Reindeer Craft
Family Handprint Tree
Santa Handprint Craft
Which of these 6 Handprint Christmas Crafts do you want to make with your kids first?
I think my kids will love the Santa Handprint Craft!
If you have a favorite Christmas Handprint Craft idea please tell me all about it in a comment!
Pin It On Pinterest To Save Or Share With Others so Their Kids Can Enjoy These Handprint Crafts Too!


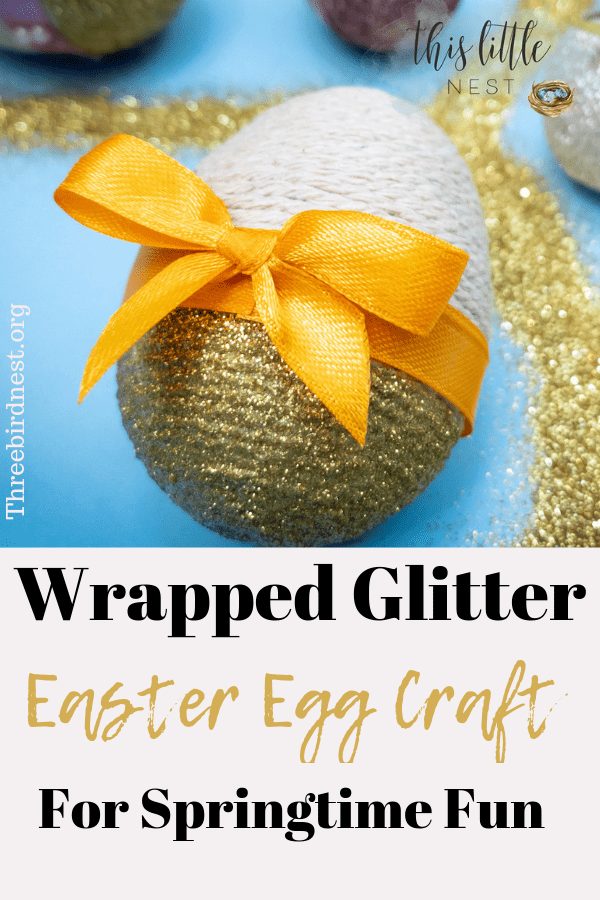
Spring is almost here and with it comes warmth, flowers, colors and fun holidays like Easter. It’s the perfect time to celebrate with some Easter egg crafts with your kids or by yourself.
Today’s Wrapped glittery Easter eggs are something you can use for years to come as pretty holiday decorations or you can add them to the easter hunt to bring a little variety and glitter to their baskets.
You can use colored twine and different colored ribbon and glitter or you can use the simple cream-colored twine like we did. This is a fun crafting project for all ages! So let’s get into it.
***Check out this Cherry Sparkle Slime we made with the kids the other day. It’s non-sticky, no mess slime you and your kids will love.
**By the way, this post contains affiliate links at no extra cost to you. As an Amazon Associate, I earn from qualifying purchases. This helps me keep my blog up and running and I only list products that I love and have used myself. Thank you for your support!
Wrapped Glitter Easter Eggs With Ribbon
Pin It On Pinterest!

First Grab all of your crafting materials. This project is super cheap to recreate and you can find everything you need in the list below on Amazon. Just click the product to find out more.

Here’s your list:
Foam eggs
Flax twine or yarn
Scissors
Flat Paint Brush
Liquid glue
Textil glue
Glitter
Ribbons
Decor pearls (optional)
Now let’s grab our glue and our foam eggs. Put glue in the hole in the top and start your twin or yarn there. Stick it in the hole so it will stay put. Be sure to put down a piece of paper underneath so you don’t get glue on your table or counter.

Next, begin wrapping your twine slowly in a circular pattern. Be sure to lay a strip of glue for each circle to hold the twine firmly in place. Taking your time and using the right amount of glue will make these decorations last for years.

Continue to slowly wrap the twine all the way down the egg. As you go push the twine in firmly so that it lays tightly up against the foam egg.

After that, add a thick layer of glue to the bottom half of your egg. This will hold your glitter on a bit later.
Other Crafty Posts:
15 Fall Crafts Your Kids Will Love
16 Crafty Ideas For This Fall
Disney Gifts Your Little Princess will Love

Now we get to the fun part. We get to add glitter! You can use any color you want or add several colors for a more festive Springtime feel. We used a lovely gold shade here.

Simply take the egg in hand and pour your glitter of choice. As you pour, turn the craft all the way around until the glitter meets on both sides.

We poured it heavily on so that it would fully cover the egg. It looks prettiest if the glitter is nice and thick.

Now grab your glue again and a good flat brush. Put some glue on your brush and add a thin layer over your glitter. Use a light touch so the glitter doesn’t get wiped away.
This will help secure the glitter onto the egg so that it’s not constantly shedding. When your are done the results will look professionally made.
Now it’s time to add our ribbon.

Pick the ribbon of your choice and glue it around the egg center. Once you get it wrapped you can cut it so that it’s even and meeting on both sides. Glue it together where they meet.
Next, will add our bow.

Cut a piece of ribbon and tie a perfect little bow. Once you have it the way you want, glue it to the egg right on top of the seam where the ribbon meets.

And there you have it. The perfect Easter Holiday decoration that you can use for years to come. Happy upcoming Easter and enjoy!

If you loved this craft it would be awesome if you save it on Pinterest with the special images below or you can save it with the buttons at the top or bottom. Thanks!!
You can also download this recipe as a pdf with the purple button at the very bottom of this post. Just click on it and it will be sent to your inbox.
Pin It On Pinterest For Later With These Special Images!


Slime is always a fun activity for young kids, and sometimes older ones too. It’s satisfying to make, they enjoy the process and afterward, they get to dive into mess free squishy fun.
It is a great sensory experience and can be made in so many fun different ways.
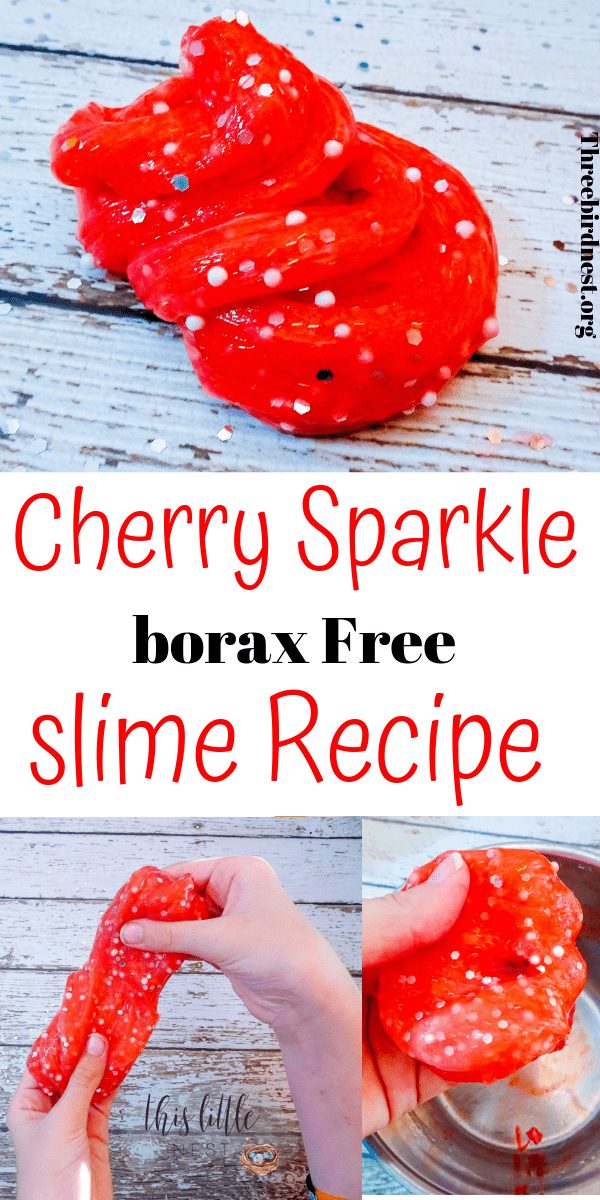
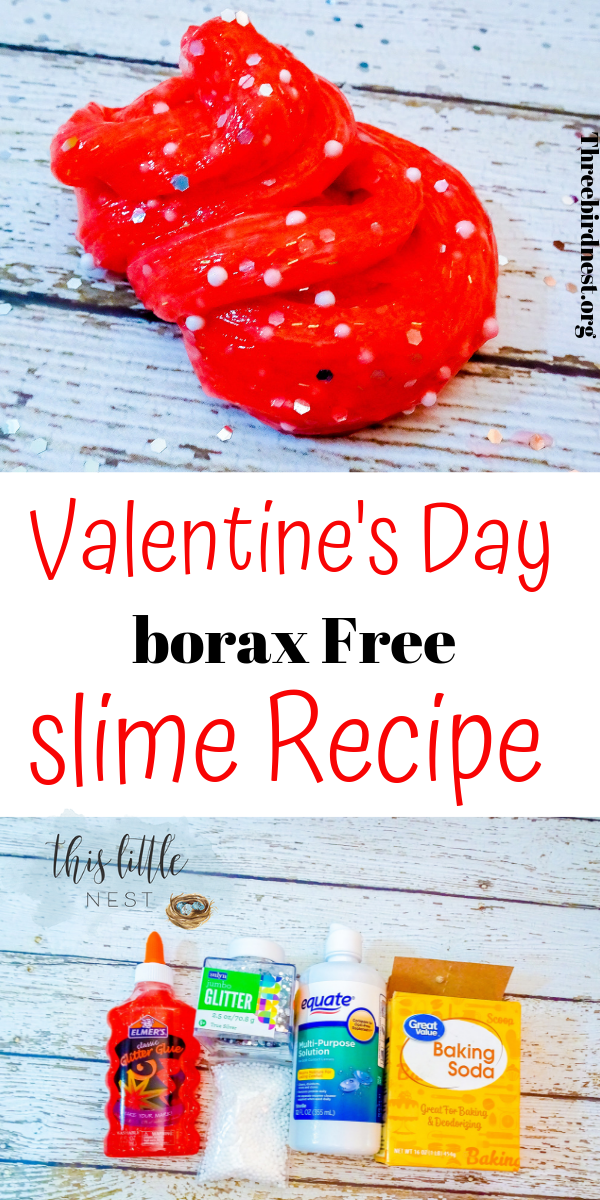
Today I have an awesome red and glittery Borax free recipe that you and your babes are gonna love!
**By the way, this post contains affiliate links at no extra cost to you. As an Amazon Associate, I earn from qualifying purchases.
Red Glitter Cherry Slime For Valentines Or Any Time!
Pin It for Later On Pinterest
If this is your first time making slime lets talk about it for a minute. Our slime is non-toxic and it’s made of non-sticky ingredients ( once mixed ). It comes together perfectly to make the best product.
We use Elmer’s liquid glitter glue with baking soda and contact solution. Then we add some pretty things to make it darker in color and sparkly. See The Actual Recipe with amounts at The bottom of the post.
Slime is a lot of fun for kids to play with – however, we recommend adult supervision and that adults should make the slime while the kids assist. Until the product is mixed the glue could possibly get messy.
One more thing, while this cherry slime looks good enough to eat, it is definitely not edible. Make sure the children you are creating with realize that it’s not something they should be eating.
Here are the ingredients you’ll need to get started:

Once you have everything together you can begin mixing it up!
Slime Tip: Always use the glue indicated in the recipe. Using a different brand could yield different results. We use good ole Elmers Glue in our recipes. It’s the best for making slime.
You begin by adding your glue, baking soda then you move on to the contact solution.

After mixing the main ingredients together you get to add the fun stuff.
But this step is optional. If you want to make a quick slime recipe you could stop here and leave out the glitter and add-ons. But here we think the more glittery, the better!

We added jumbo silver glitter here but you can go on to add a variety of things including colored sprinkles. When adding sprinkles let it sit for a few minutes then spread it with your fingers to get an amazing rainbow effect ( not shown here ).

We also added little styrofoam balls and mixed those in to add a little more bulk to this sensory experience.

After this step, you can allow your children to help if you’d like. It won’t be sticky anymore and they can help mix up the glitter and balls.
Other Crafty Posts:
15 Fall Crafts Your Kids Will Love
16 Crafty Ideas For This Fall
Disney Gifts Your Little Princess will Love

Then if you want to darken your cherry slime you can add some food coloring. This will make the color denser and a little less transparent but this is optional. Put it back in the bowl and do this yourself to avoid any messes.

And this is what you’ll get after it’s all said and done! A really pretty, bright red slime that is soft to the touch and not messy at all.

Have a look at the texture. It doesn’t come apart in little globs so it won’t be left all over the house or get caught in the carpet. It’s good stuff.
Be sure to read the instructions carefully. The type of contact lens solution you need and glue is really important! Substituting these ingredients for other brands may result in your slime not working. We also do not recommend substituting the brands in the recipe for a generic ( as I mentioned before ) because their formula will no doubt be slightly different.
You can find the full recipe below the picture with the exact products we used listed in the links. Have Fun!!

Slime Recipe Ingredients: Click On The Product To See It On Amazon
Add your glue to a bowl then add in baking soda, water, and contact solution. Mix well until slime no longer sticks to the bowl. Add in more contact solution as needed.
Add in glitter to your preferred amount. 2-3 tablespoon normally but you can add more or less. Mix into the slime with your hands.
Add in styrofoam balls. One tablespoon or so more as desired, mix in well with hands.
Store in an airtight container when not in use. Slime will last several weeks.
If you loved this post it would be awesome if you could share it with your friends. You can share it on Pinterest with the special images below or with the buttons at the bottom or side of the post.
Pin It On Pinterest For Later With These Special Images!


Fall is the best time of year and one way to get in the autumn spirit is to do fun Fall Crafts with your kiddos. When the temperature drops and you have to stay in these activities will keep them busy and happy. It’s all good fun!
***If you missed my First Fall Crafts Post that I created this year you can check it out right here.
15 More Fall Crafts For Kids
Paper Bag Crafts

The Pinterested Parent does it again with these amazingly fun Paper bag crafts. Find out how to create these here..
Create Leaf Turkeys

Make these silly turkeys with Crafty Morning.
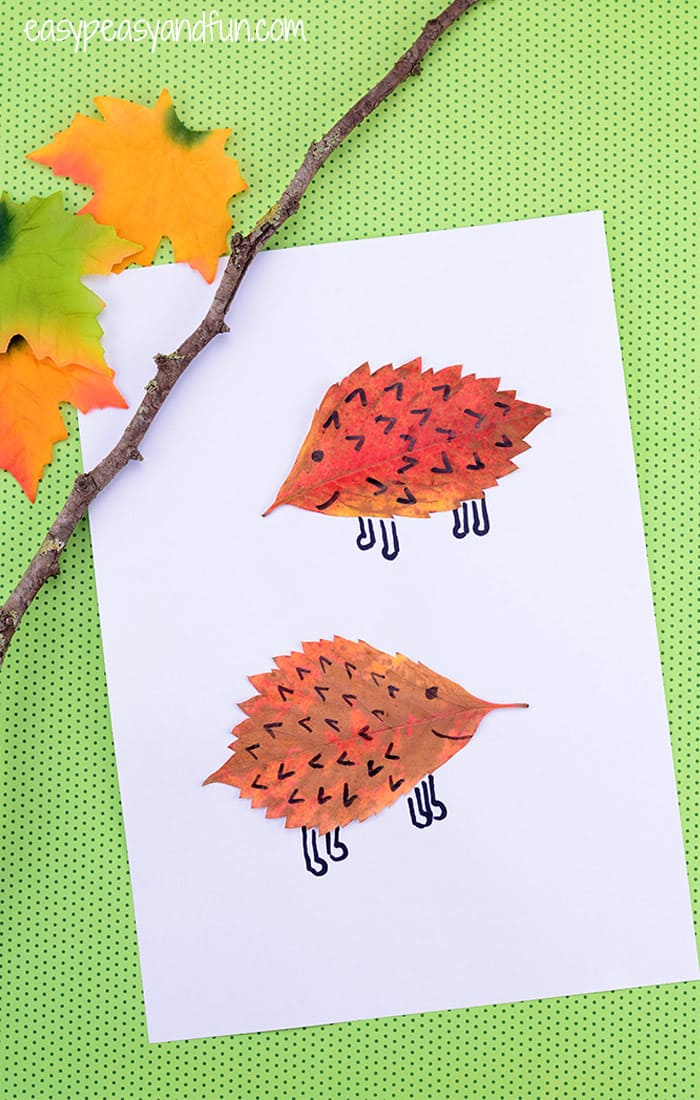
How About Making Hedgehogs WIth Leaves??
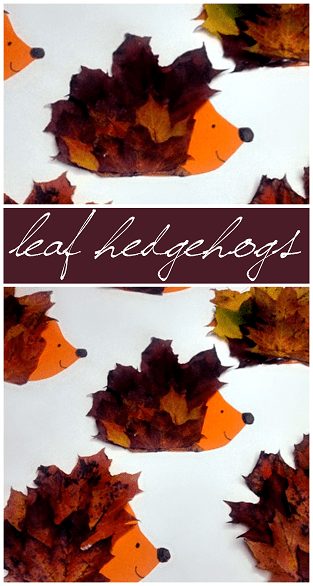
Here’s another one straight from the Crafty Morning Blog. This little guy is so cute and fun to make!
Puffy Paint Candy Apples!

These Look so Good it makes me want Candy Apples. Find out how to make them at I Heart Arts And Crafts.
Popsicle Stick Apple Cores With Glitter

I’ve got lots of apple crafts here today. Find out how to make this one at Glued To My Crafts.
Another Sweet Hedgehog With Glue
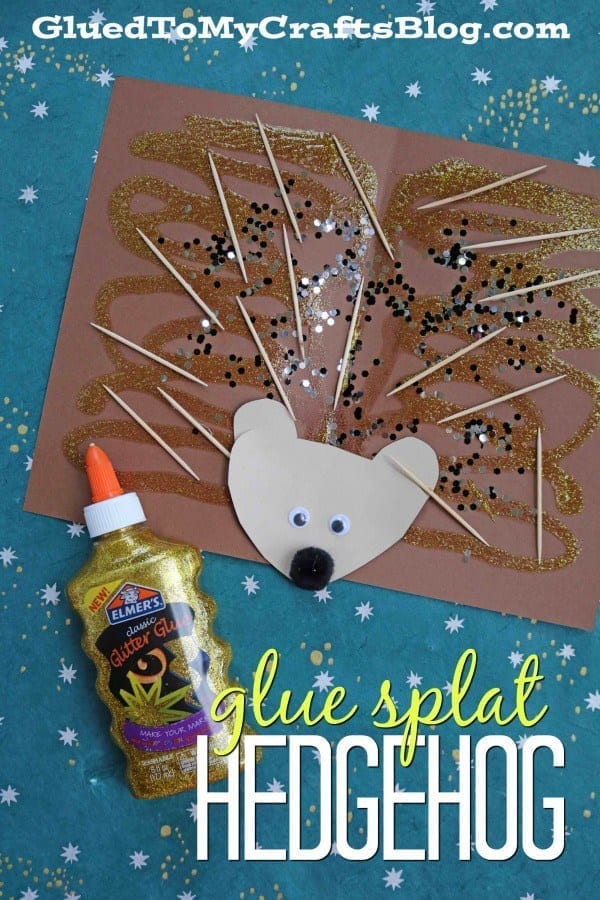
This is an easy one even toddlers can do! Take a look at Glued To My Crafts.
Fall Tree Math Craft

Here’s Something Fun And Easy from Coffee Cups And Crayons.
A Felt and Fiber Hedgehog

This is most definitely my favorite hedgehog on the list over at Artsy Craftsy Mom.
Tissue Paper Plate Apples
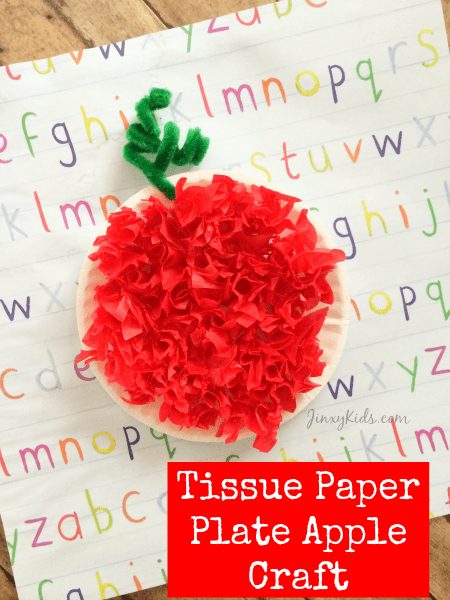
This is another cute and simple apple craft from Jinxy Kids.
A Nifty Handprint Tree
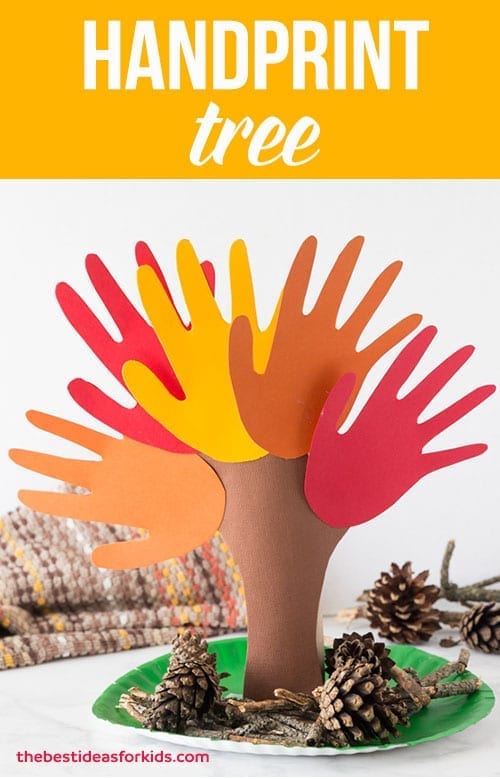
This Will make a nice Thanksgiving decoration for the kids to show off over the Holiday. See At Best Ideas For Kids.
Painted Jack o Lantern Rocks
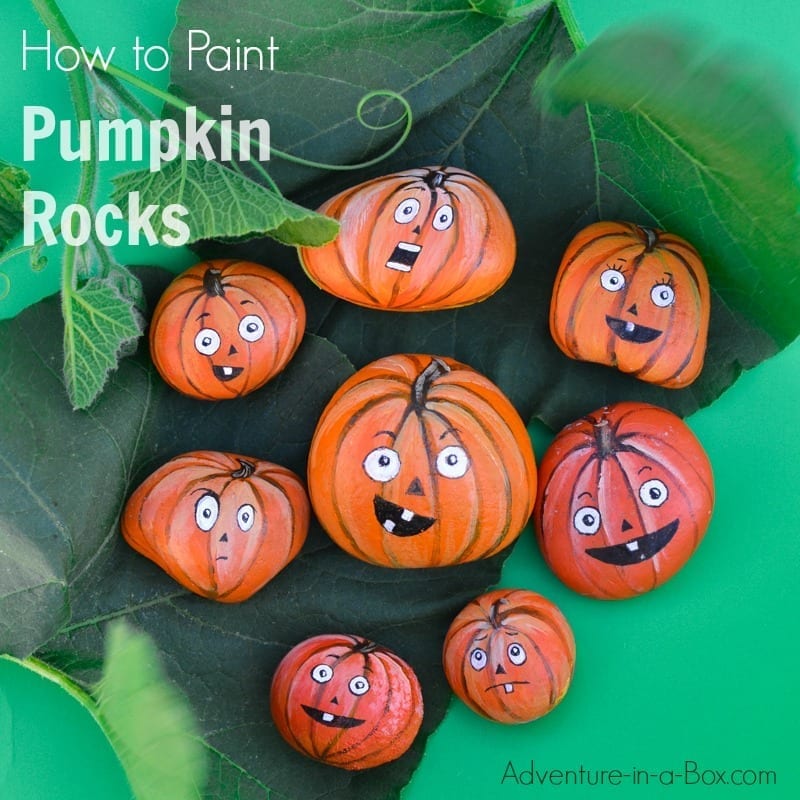
These are so cute! Make them with Adventures in a box.
Halloween Pumpkin Salt Painting!
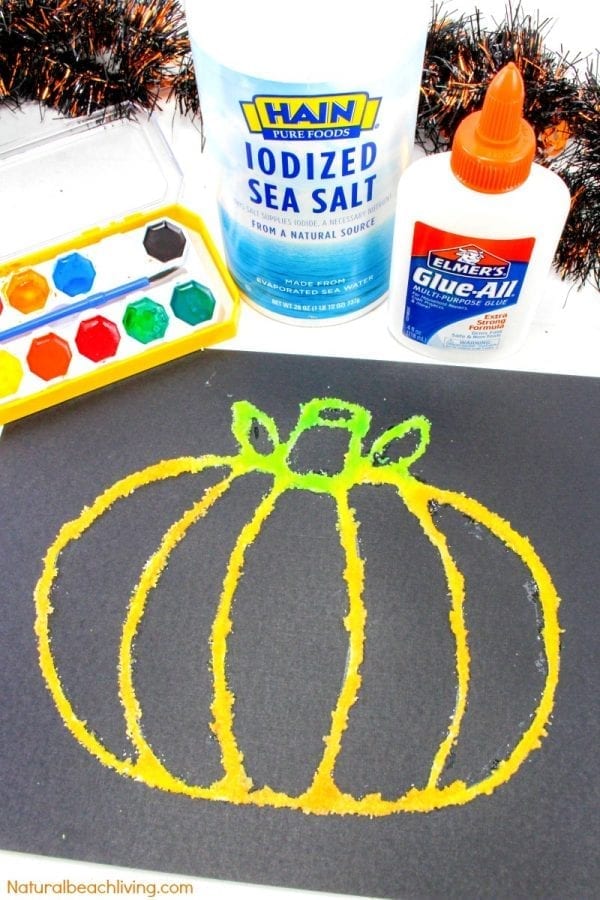
This is an interesting way to use salt. Find out how to make it at Natural Beach Living.
Stuffed Paper Apples

These are really rustic and fun looking. Buggy and Buddy will show you how.
Paper Strip Pumpkin Craft

Fireflies and Mudpies want to show you how to make these. Check them out here.
Hanging Toilet Paper Roll Bat
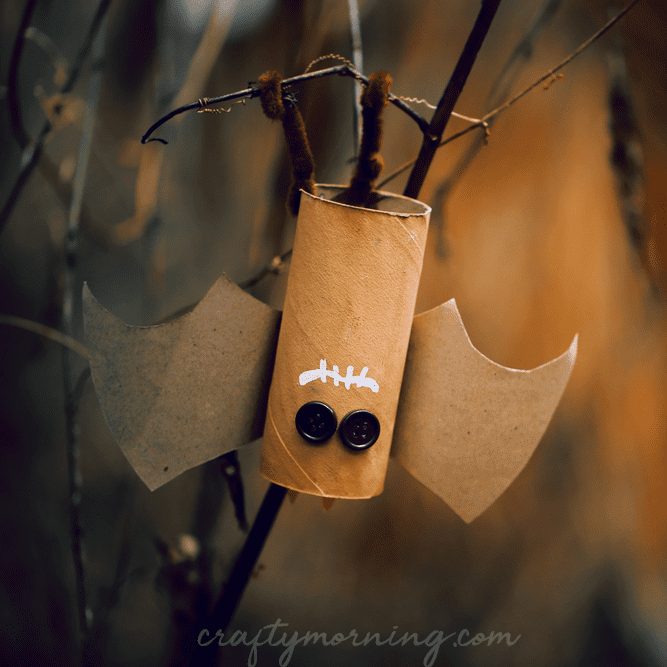
Here’s something to do with those old toilet paper rolls. See it at Crafty Morning.
That’s it! May Your Fall Be Colorful and fun!!
I’d love it if you would share this post with your friends, it means so much! Share with the buttons to the left or pin images below!
Pin it for later on Pinterest!


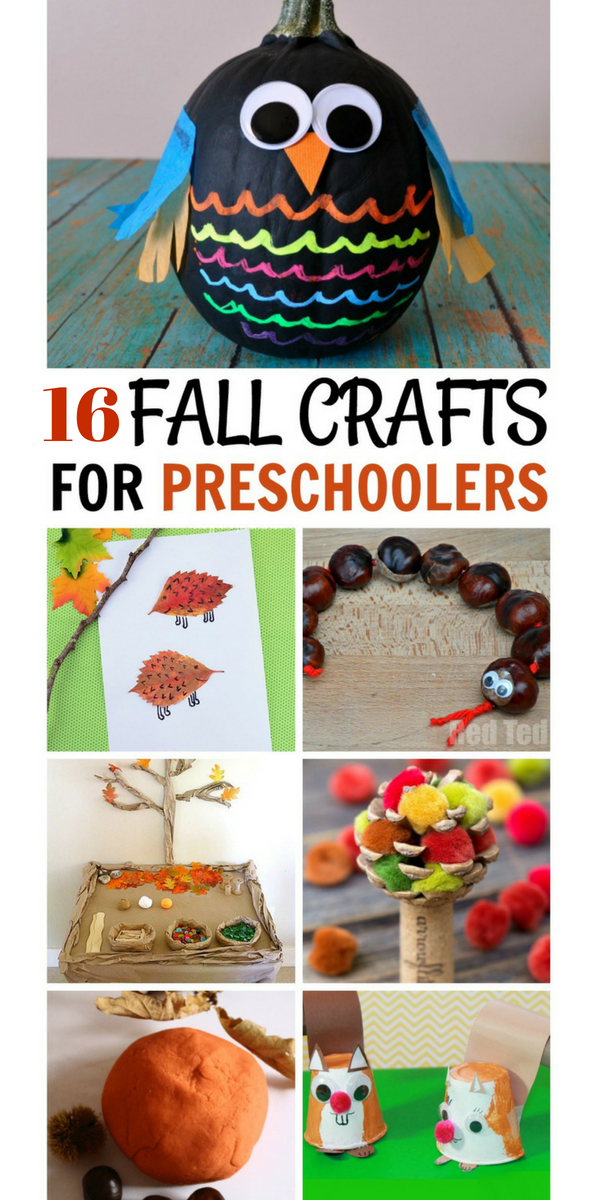
It’s almost Fall again, Yay! It’s the absolute funniest time of the year. The Weather is always dreamy and the Leaves are crunchy and beautiful.
There are so many fun things to do and creating Fall Crafts is at the top of the list. In this post, I give you 16 Crafting Ideas for you and your little ones to enjoy together. Your Kids will love these ideas and most of them are simple to make.
Let’s get this crafting party started!
[wc_divider style=”solid” line=”single” margin_top=”” margin_bottom=”” class=””][/wc_divider]
Help your little one develop Fine Motor Skills With A fall Tree Craft Created With Dot Stickers. Fall Tree Craft From Fun Learning For Kids

Create A Horse Chestnut Snake With Red Ted Art. Learn How Here.

Make Some Leaf Puppets! This is so crafty and cool. See how on Messy Little Monster.

Make Autumn Leaf People! This is another Great, leafy idea. Learn how at Thimble And Twig.

Autumn Playdough For Sensory Fun. Check Out This 4-minute recipe over at Rainy Day Mum.

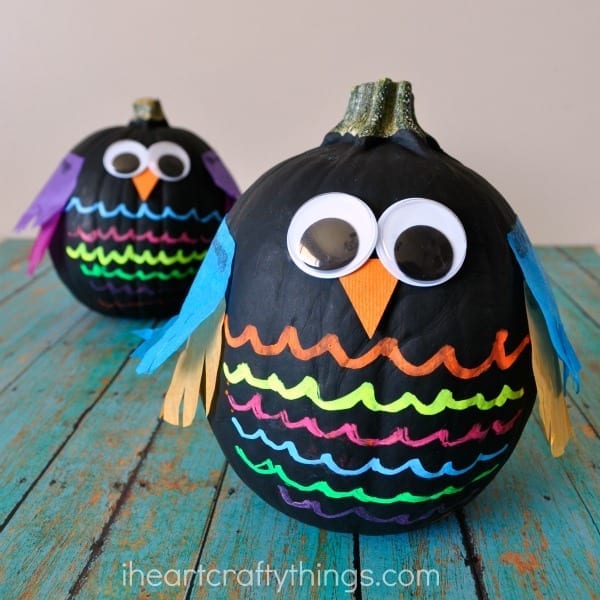
How About Creating COLORFUL NO-CARVE OWL PUMPKINS?? Find out how over at I Heart Crafty Things
Want To Make A Pretty Hanging Leaf Mobile Craft? Check it out at The Imagination Tree.

How about a FALL SENSORY & SNACK STORY TIME? Sounds fun right? Learn more here.

Felt Fall Tree Play Set Inspired by The Little Yellow Leaf By Buggy And Buddy!

How about a Leaf Hedgehogs Craft By Easy Peasy And Fun.
Learn How to make a colorful Fall Pine Cone Tree With Fireflies and Mudpies.

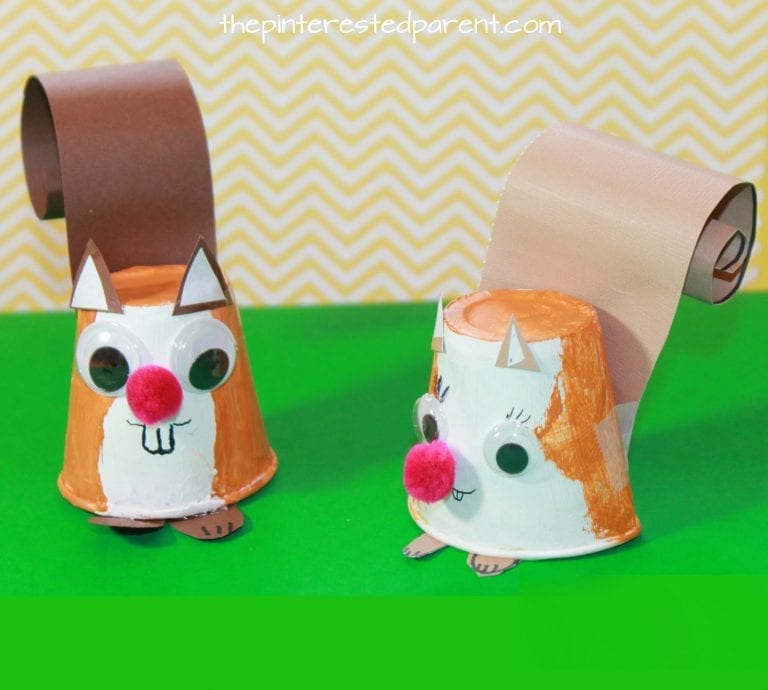
Why Not try something fun like making a Dixie Cup Squirrel? Take a look at The Pinterested Parent.
What Do You think of this Tissue paper and leaf craft from In The Playroom?

How about creating Fall Button Trees? How Cute is that? Get the details over at How We Learn.

Here’s another great Craft from The Pinterested Parent.

My Mommy Style has a Fun and easy leaf people craft you could do too. See Photos here.
[wc_divider style=”solid” line=”single” margin_top=”” margin_bottom=”” class=””][/wc_divider]
These are some great and simple Fall Craft Ideas for Kids, Am I Right? I love The fall Sensory Playdough myself! I think using Autumn herbs will make the colors fun and it will smell heavenly!
I hope you and your little ones enjoy Fall to the fullest!
If you like this post I would love it if you would share it with your friends! It would mean so much. You can share with the Pinterest Image below or with the buttons to left or below!
Pin it On Pinterest For Later!