This post may contain affiliate links that help keep our blog up and running.
Update: BlueHost is now running a special offer For you! You can now set up your blog for just $3.95 per month For 12 months! That’s only $47.40 for the WHOLE YEAR! That Also include your FREE Domain name! Hurry before their prices go up! Sign Up Here.
Why would you want to start a WordPress Blog or home business? Because it’s life Changing. You can escape your 9 to 5 and start chasing your own dreams. You can work towards something for you and not grind yourself to the bone for someone else’s dreams.
With hard work and determination, you can be making thousands of dollars a month within a year that will often far surpass what you were making before. You can wake up each day, have a cup of tea, and design your own day how you see fit. You are in complete control and it’s very liberating!
With a little planning and Motivation, you will unleash some serious ambition.
{ Hold Up Real Quick. If you’re interested in learning more about blogging I have a free course that has helped others set up great blogs with a solid framework. It’s free, no strings attached. Sign up Below! }
Once you get started you’ll realize it’s one of the best things you have EVER done. This happened to me and I’m just your average mama..~ True Story!

Pin This For Later On Pinterest So You Can Come Back to it!
Today I want to walk you through the steps it will take to set up your own blog or website for your business, and get you on your way to the life you want! Stop putting it off and do something great!
You don’t have to spend thousands of dollars to have someone set up a website for you either. It’s actually very cheap and simple. You can do it all yourself in 15 or 20 minutes. It’s crazy easy!
The very first thing you need to do is sign up for online hosting and get your domain. You can do that with BlueHost all at once and they’re the leaders in the industry.
Why Choose BlueHost??
Why Choose Them? Because BlueHost is only the best there is. It’s also Dirt cheap yet they offer top of the line service. Buying hosting with one of the other popular companies like Host Gator will get you poor service, a website that is down often, and Blocked the second you come even close to running out of space. That’s a big mistake, Don’t make it. Then you have to worry about transferring your website and that can cause its own problems. It’s not an easy process.
You should start off smart and get it right the first time.
BlueHost is so cheap, right now you can get Hosting for $3.95 a month! So Do it now before prices go up. You can go ahead and sign up here if you want to do it now, and then come back to this tutorial and finish your set up.
BlueHost also offers a free domain, it’s incredibly easy to use, and there’s a money-back guarantee and you can reach them 24/7 for tech support and customer service. Like I said, the best of the best.
A Quick Note: Never host your site on WordPress.com {Wordpress.org is the choice of all professionals}, or sites like Blogger. These companies limit how you can make money on site { No ADs aloud! }, they have limited space, they often look terrible and you don’t own your domain. It’s unprofessional and worst of all you can be shut down at any moment!
Moving on….
The following will be a step by step guide to setting up the blog or Biz you have always wanted and how to actually begin making money from it. Trust me if I can do it, anyone can! This guide has every single step. You won’t be left wondering what to do next.
Let’s Start A Blog Or Business Site!
In this tutorial, I will give you step by step instructions with screenshots on How to Start A Blog as painlessly as possible.
{If you think you won’t be able to finish this post today make sure you pin it or save it so you can come back to it and get the job done. You can save it by going to the bottom of the post and pinning it to one of your Pinterest Boards, There’s a big, beautiful pin made especially for this post. Or save it in one of your social media profiles with the buttons to the left}
There are three easy steps to take:
-
- Set up Hosting and Picking your Domain {$3.95 per month with a FREE Domain}
- Install WordPress {FREE}
- Make it Pretty with the right theme {$0 To $100}
Let’s Begin!
This is what their front page looks like when you go over to the site~
You can get there by Clicking Right here.
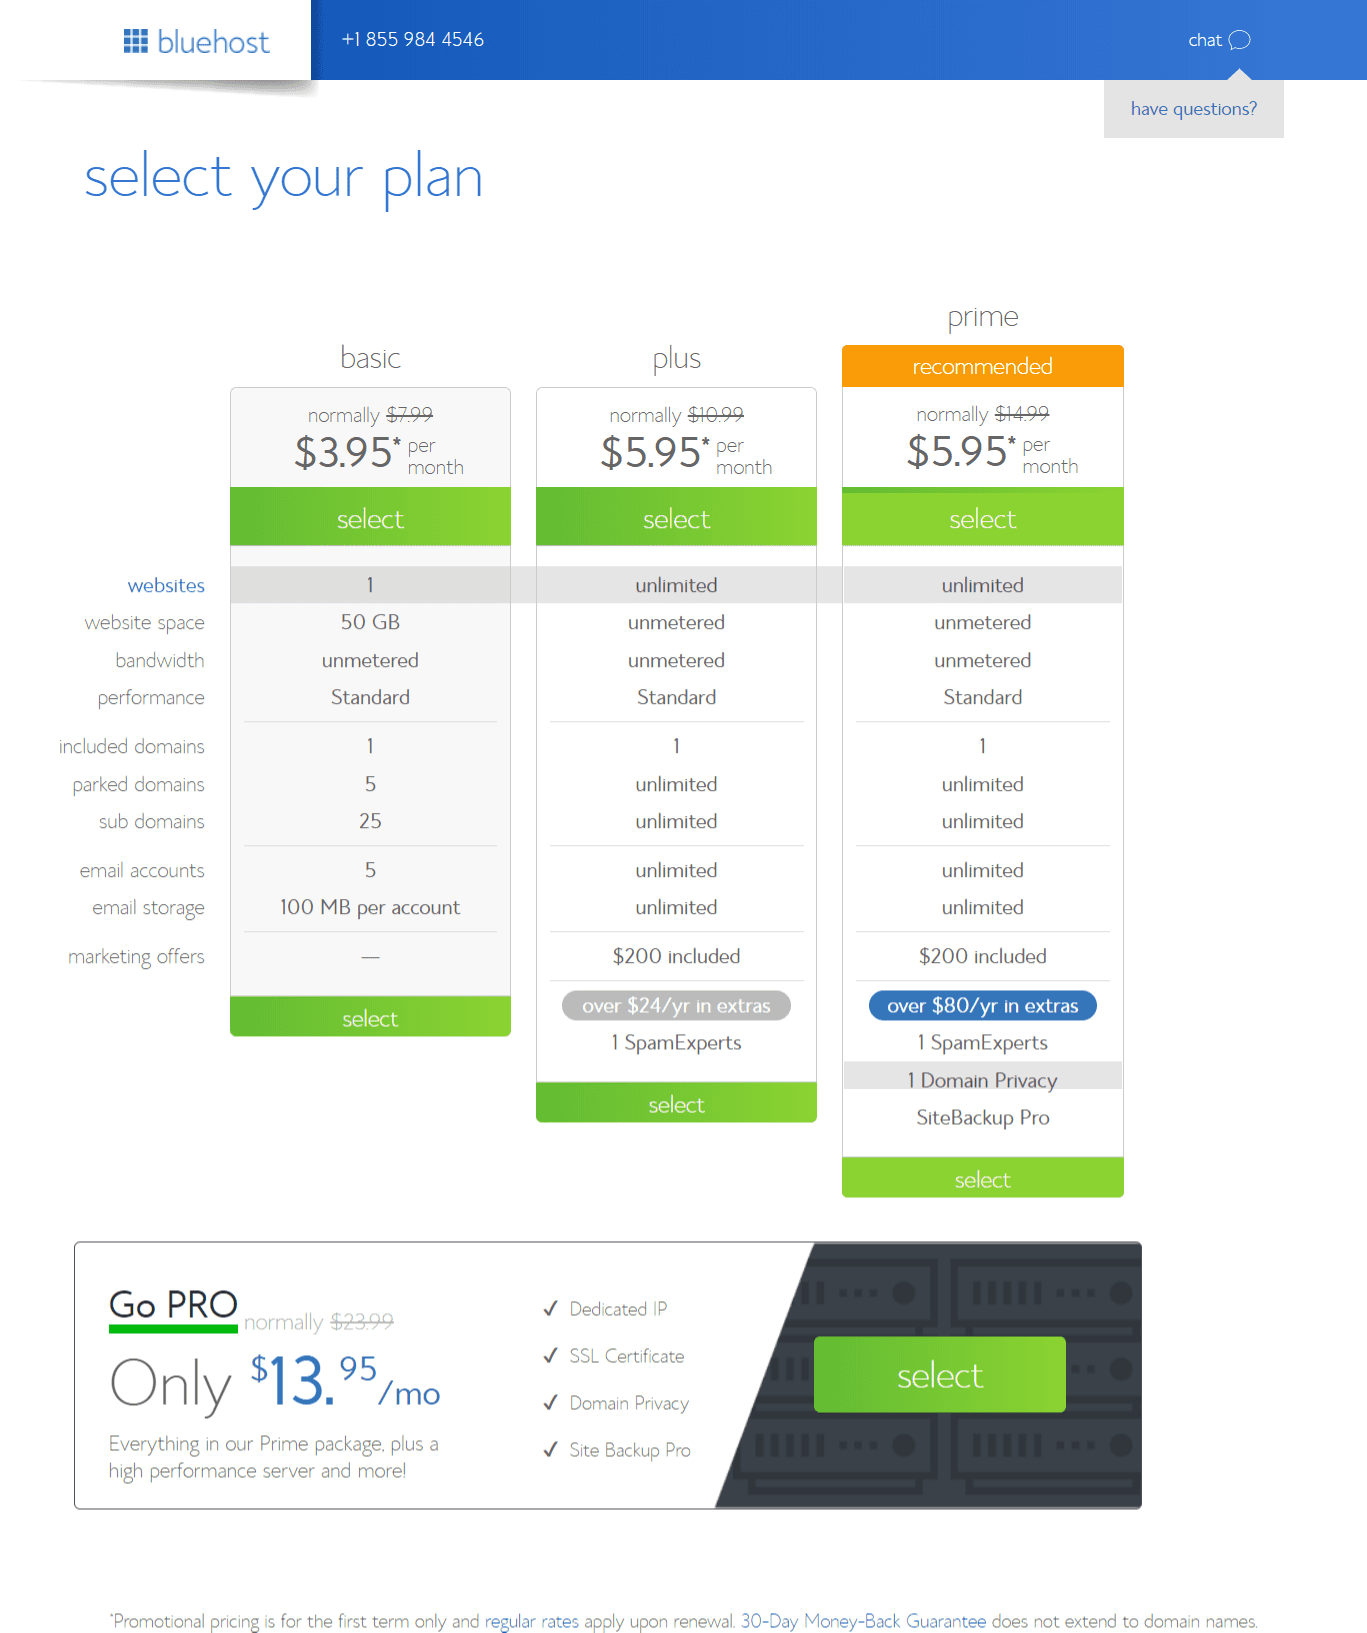
Once you decide to go for it you’ll be taken to the next page where you will be able to pick your plan. Here’s what your next step will look like~
If you’re on a budget then go ahead and pick the cheapest plan for now because that’s all you’ll need at first. You can always upgrade later if you want. This package information is for space requirements and how many websites you want to add. You will get to pick your time frame package coming up in just a few minutes.
Get Your FREE Domain
You can get your free domain name right now by clicking here. Or You can check availability for the one you want in the box below:
This is what the Domain Name page looks like on BlueHost and it will be the next page you see after picking your package from the screenshot above.
If you already have a domain name then you would just add that in the second box on the page from the screenshot above. It’s still all very simple to do.
Enter the domain you have chosen and now you can move on to creating your account~
On this page, you can decide how long you want to purchase hosting. You can choose 12, 24, or 36 months. The longer the period of time you choose, the more money you’ll save.
Add your credit card info and you have got yourself a website. Congratulations!!
Now you will be guided to create your password. Make sure you create a very secure one and write it down right away in a safe place.
Now let’s get ready to install WordPress!!
Installing the Infamous WordPress
By Choosing BlueHost you have made setting up WordPress so much easier!
Bluehost offers “one-click installation” for WordPress beginners so that you can have your site ready to go in seconds.
After creating your password you will be able to log in to your cPanel. That is the back end of your hosting account. It’s where you can create your website, create emails, view space limitations and change passwords.
I recommend hopping over to YOUTUBE after you’ve set up everything and watch a quick 10-minute cPanel video so you know where everything is at on their platform. There are thousands of videos to choose from on the subject.
So Moving on.. Once you’re in cPanel you’ll need To Head to ” My Sites ” and click Create Site as shown below in the screenshot.
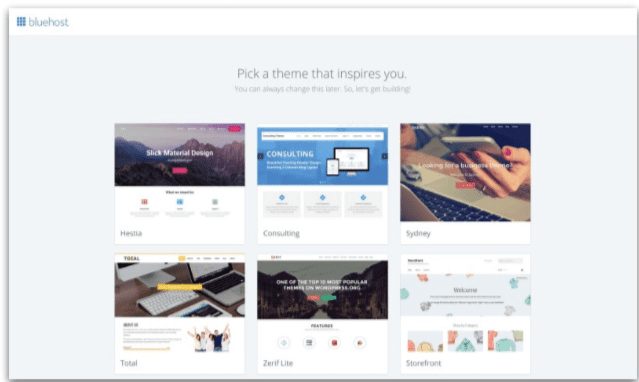
After that, they’ll ask you which theme you want to pick. You can pick a free one if you want to start but they are limited in design and the code is not always very good which has been known to cause problems.
All Professionals have a premium theme and almost everyone uses DIVI by Elegant Themes. It’s by far the best and most professional and versatile theme designed especially for WordPress. I could sing their praises to the moon and back, I adore them so much. I build all my sites with them and no matter what you pick now you’ll eventually make your way over to DIVI. Everyone Does. You cannot make your site look better with any other theme. Plus with the Divi theme membership, you also get the premium theme EXTRA And the Premium plugins Bloom {Used for email opt ins} and Monarch {a Social Media plugin that adds links to your posts and pages for sharing}. You can check them out right here.
Anyway, You can pick one of the free ones for the moment then Go over to Elegant Themes and Install it later or you can just skip picking a theme right now. The choice is yours.
The page will look like the one below.
Next, you’ll just need to log in to WordPress. It’s as simple as that. You will see the login area to the left of the page below:
This is what You’ll see next:
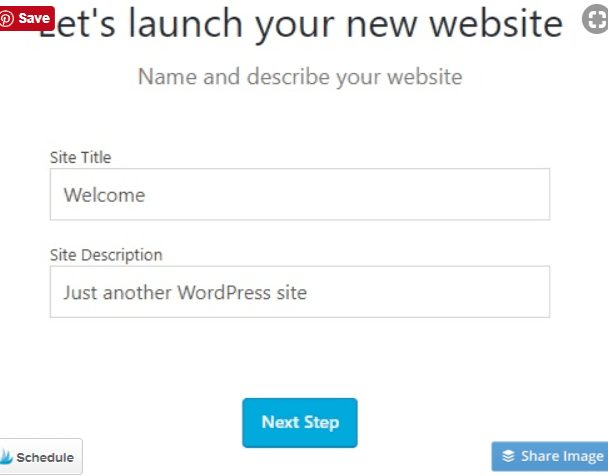
After this step you’ll see this:
Then you’ll be asked a series of questions about your site including:
Are you going to update your site regularly with news or blog posts?
What should visitors see when they come to your site? Updated news/ posts or a static homepage?
Would you like to create a starter contact page?
You’ll be asked if you want to connect Jetpack. If you don’t know what that is yet you can click ” Not Now” {Personally I don’t use Jetpack because it gave me problems in the past, So I just suggest skipping it}
Then You’ll be asked to add your biz address if you have one:
Now you’ll be close to finishing up and you’ll see this on your screen:
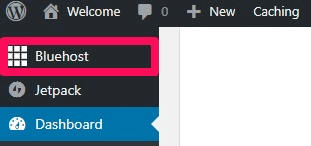
At this point, you can go back to your Bluehost dashboard by clicking “Bluehost” on the left-hand side of the control panel.
This is what you’ll see next and if you’re ready to launch your site then do it!
Now your site will be live. Congrats.
Next, let’s take a look at the WordPress dashboard so you will know what to expect.
This is what you’ll see after signing to WordPress:
On the left, you’ll see a long menu. That’s where you go to add pages or create posts. Once you get in you should click on each menu item so you can get a feel for everything and learn your way around. Maybe go to YOUTUBE and have a look at another tutorial so you can really get to know the platform.
The first thing I like to do is go to settings and make sure everything is set the way I like. There will be a drop-down menu and you can go to each link for set up.
Start with General Settings. Be sure to fill everything out.
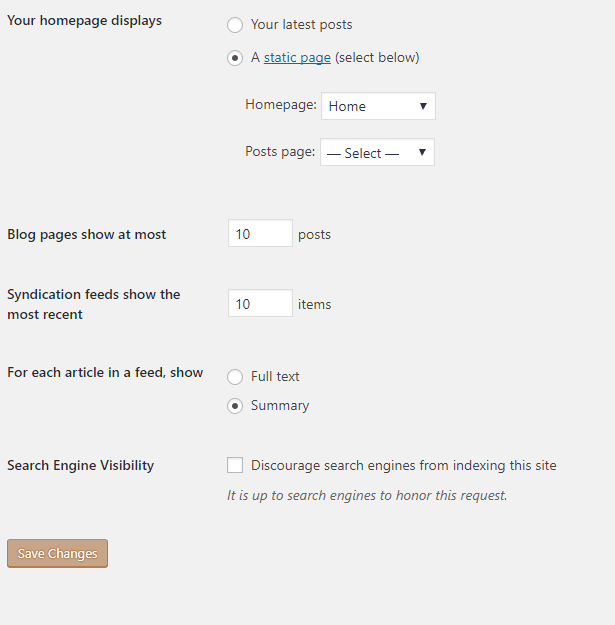
Leave the writing settings as they are. Then move on to the reading settings. If you want your homepage to be your blog posts then click on your latest posts. But if you want a front page you’ll click on ” Static Front Page “.
For each article in a feed, show Summary.
Lastly, make sure you do not check the box that says “Discourage search engines from indexing this site “
If you do Google will not be able to see your site and that’s no good at all.
Move on to the discussion and media links and pick your preferred settings. Then on to Permalinks.
The Permalink section is very important to your SEO and the appearance of your site. If you don’t have the right link structure your site will seem very unprofessional. The section looks like this:
Make sure you have the post name chosen. This will create links with, you guessed it, the name of your posts. That is by far the best choice.
Appearance Of Your Site
Now you can move on to Appearance. You will find that ” Themes ” is the first link in the drop-down menu. Go there next.
You can pick a free theme for now or you can go ahead and get set up the right way and pick Divi.
Here’s what your theme page will look like:
If you pick a free theme just preview it then click on install.
Quick note: Your site will not look like the demo of the theme because you have no content yet. It may look pretty blank and maybe a little intimidating but don’t worry, it will all shape up.
If you decide to go with Divi you would download the theme from the Elegant Themes website and then you would click on the upload theme button on the screenshot above in the top left corner.
That would take you to a page that gives you the option to upload your file. Search and upload it and then click install.
It will then automatically install and the deed is done. To learn more about Divi once you have it installed, again I will suggest YOUTUBE. They have TONS of amazing videos on Divi and you’ll never be left wondering how to accomplish your task.
The next step will be to add Plug-Ins to your site.
Plug-Ins
So what is a Plugin anyway??
“Plugins” are extensions that are built to increase the capabilities of WordPress’, adding features and functions to your site that doesn’t come built-in.
You can use plugins for SEO, Google Analytics, Cacheing your site, Optimization of all kinds, Social Media and so much more.
To get to this section of your site just go to the left-hand menu and click on Plugins. This will bring you to the page where you can install what you need. { Screenshot Below }
Here’s what the plugin area looks like:
You’ll likely find that WordPress Comes with a few plugins when Installed. I always delete these and add my own. Here’s a list of plugins I recommend for your site:
- Yoast SEO Plugin~ This is the very best SEO plugin made and used by almost everyone
- WordFence~ This one will protect your site from spam and malware
- Fastest Cache~ The Best Cache plugin to keep your site quick and clean
- BJ Lazy Load~ This one speeds up your site by loading the large pictures as the readers move down the page.
- Broken Link Checker~ This will keep all your links healthy and that’s really important to Google
- Pretty Links~ If you end up with any affiliate links on your site they need to be nofollow. This is also completely necessary and important to Google.
- WP Smush~ This will help keep your pictures light and your site quick.. Make sure you have it.
There are thousands of other plugins you can consider to create more functionality to WordPress but keep in mind, Plugins can load down your site and slow it down, So keep it as minimal as possible.
But the ones above, in my opinion, are a must.
If you buy a premium Plugin or find one somewhere other then the backend of your WordPress, You can simply upload it into your system. Just click on the upload button at the top left and then upload your file as we talked about when discussing theme installation.
Now that you’ve chosen your plugins and set those up we can move on to editing your sidebar.
Sidebar and Widgets
The sidebar is the section of a website usually to the left with the information you can click on to move around on the site. There’s usually a search bar, Latest Posts, Ads, Categories and things like that.
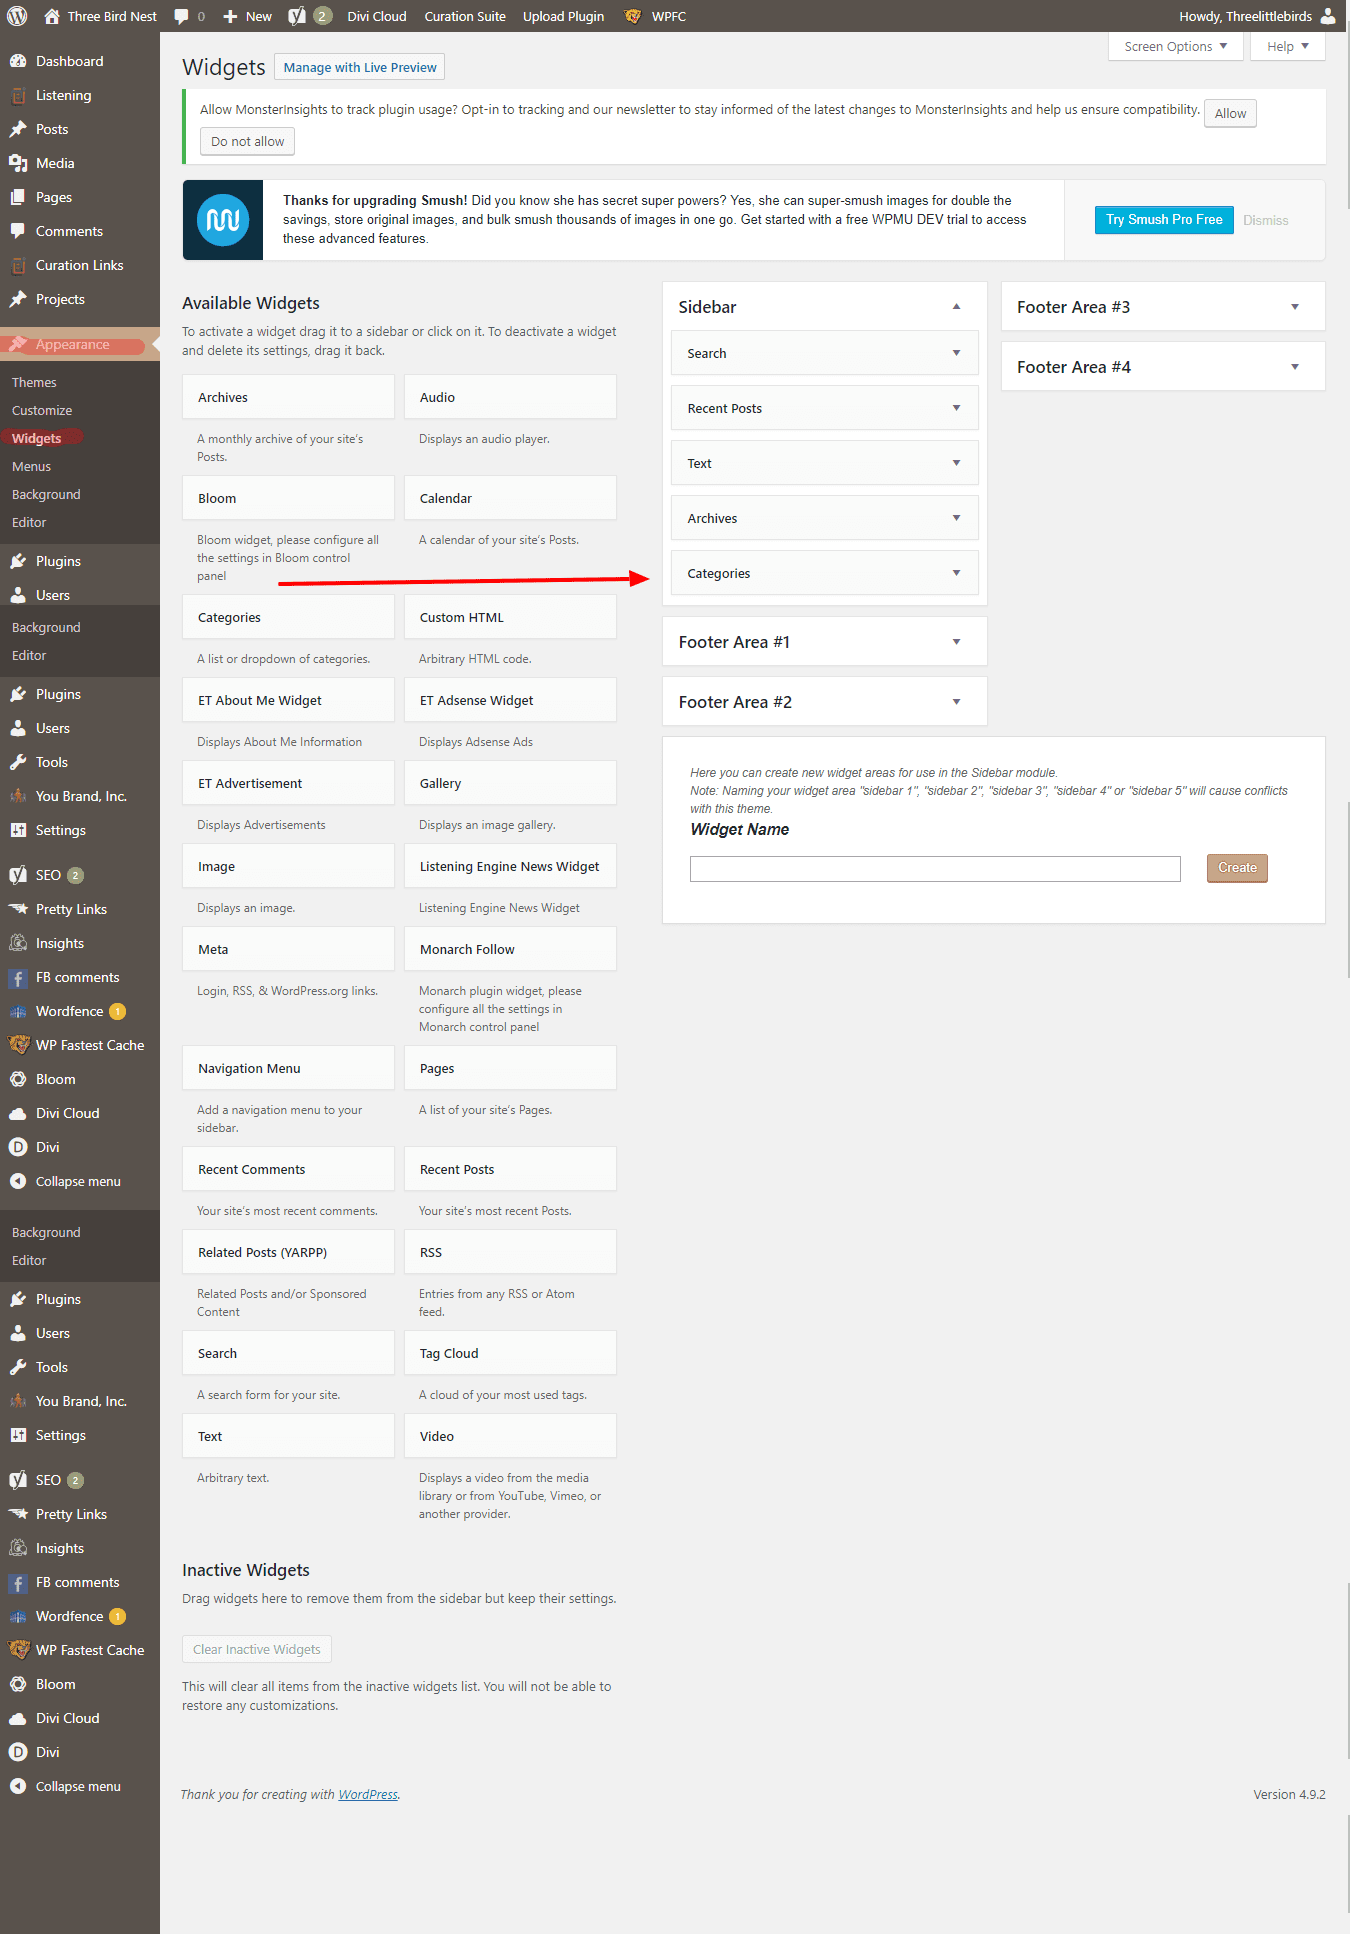
To edit this section you will go to ” Appearance ” on the left-hand menu and when the drop-down menu appears you will pick ” Widgets “. This will take you to a page that looks like this:
This area of the site is a drag and drop section.
First, have a look at the right side. That’s what is already in your widget area.
If you want to get rid of sidebar items you do not need like “Categories”, “Meta” and “Archives”, which are usually pointless, click on them. It will open up and you’ll have the option to delete the widget from that area.
Now pick the widgets you would like shown on your site and simply drag them from the left to the area on the right where you would like them placed. They will then open up and you can fill out any needed information.
With the Divi theme, you can create custom widget areas that you only show on certain pages. This is an amazing feature and it keeps your pages and posts on point and relevant.
There’s also an “HTML box” – a text box where you can use HTML code. This is how you can put ads in your sidebar.
Drag over a text box, open it up, and then click on the text tab at the top right so the system knows you’re adding code. Add the code then click back to visual and you’ll see the ad.
Here’s a screenshot of the text widget:
It’s all pretty easy once you get the hang of it. If it seems overwhelming now, Don’t worry, Understanding WordPress will come to you fast.
The last thing I want to go over is how to add content and create pages.
Adding Content
So now it’s time to add the content to your site. You can begin by taking a look at your left Menu once again.
There’s a section for pages and a section for posts. Your pages should be your main information. For instance, your home page, about page, any legal pages, and contact forms will be permanent pages.
All blog entries or articles will be under posts.
To create a new page or post click on the link and you’ll be taken to a page that looks like this:
You need to simply add your content and photos. After you’re done make sure to proofread TWICE and add tags, category, and your YOAST SEO data at the bottom.
A quick tip: To add photos to your posts click on “add media’ at the top of the toolbar in WordPress. You can see it in the screenshot above. That’s where you’ll be able to upload your photos into your WordPress Library.
Then add your feature image, preview, and then hit publish.
Wash, rinse, and repeat over and over to populate your blog or website with content that will bring in more and more readers over time.
That’s pretty much it. You should now know how to create your website and move around WordPress with confidence.
You will learn more as you go and it will get easier and easier. Being a success will depend on your motivation and consistency. If you’re ambitious, there’s nothing stopping you! You can do this and I’m rooting for you!
Would you like to learn even more about the blogging process? I have a series that goes into the mechanics of running a successful, money-making blog and I suggest you read it. The links are below:
The Key To Being A Successful Blogger { Part 1 }
Deciding on a Niche for your blog { Part 2 }
Different Ways To Make Money as Blogger { Part 3 )
How To Drive Traffic To Your Blog { Part 4 }
Blogging And Email Marketing { Part 5 }
Read below for some important pro tips…
Pro Notes:
-
- Readers like to see plenty of beautiful photos when reading posts. You can find free stock photos all over the web. Never take photos from Google or other sites. You can get sued and it does happen! You can also buy amazing stock photography just for blogging at Oh Tilly’s and Ivory mix. I highly recommend both. You’ll fall in love when you see what they have to offer.
- Break your content up into small sections. Online readers hate big long paragraphs and they will hit the back button the second they see that writing style. It shouldn’t look like a textbook.
- Use Grammarly. It’s a browser extension that will double-check your grammar and spelling and all online writers need it. It’s a must.
- If you’re a blogger make sure you use Pinterest to get your posts seen. Learn how to make an amazing Pin with Canva and build up a nice following on the platform. You should do a little research on Pinterest because it can bring in massive traffic early on. You can and should use social media schedulers to get your posts out there as much as possible. Board Booster is a good choice as well as Tailwinds. Click the banner below to have a look at Tailwinds. They’re the best in this business. You can check out BoardBooster Here.
5. Make sure you get Google Analytics for your site, submit your site to Google AND Yahoo, and please know that you won’t get any traffic from Google for a while. It can take anywhere from 3 months to a year depending on how much and how often you write. This is normal.
6. You should start an Email list RIGHT AWAY. They say the money is in the list and it’s true. You need to understand and educate yourself about email marketing for a blog or business right away because it’s a big part of the business and how you’ll make money. You’ll need a good email platform to use and I will suggest ConvertKit. It’s an email platform made just for bloggers and it’s the best.
I’m going to wrap this post up here. If you found this post helpful I would love it if you would share it with your friends. I worked really hard on it to provide my readers with a solid education on how to set up a website. You can share with the buttons to the left or the ones below. Thank you so much.
Pin it For Later!
Got a question? Post it below!
Blogging Resources:
Bluehost
DIVI By Elegant Themes
Tailwinds For Pinterest And Instagram
BoardBooster For Pinterest
ConvertKit